
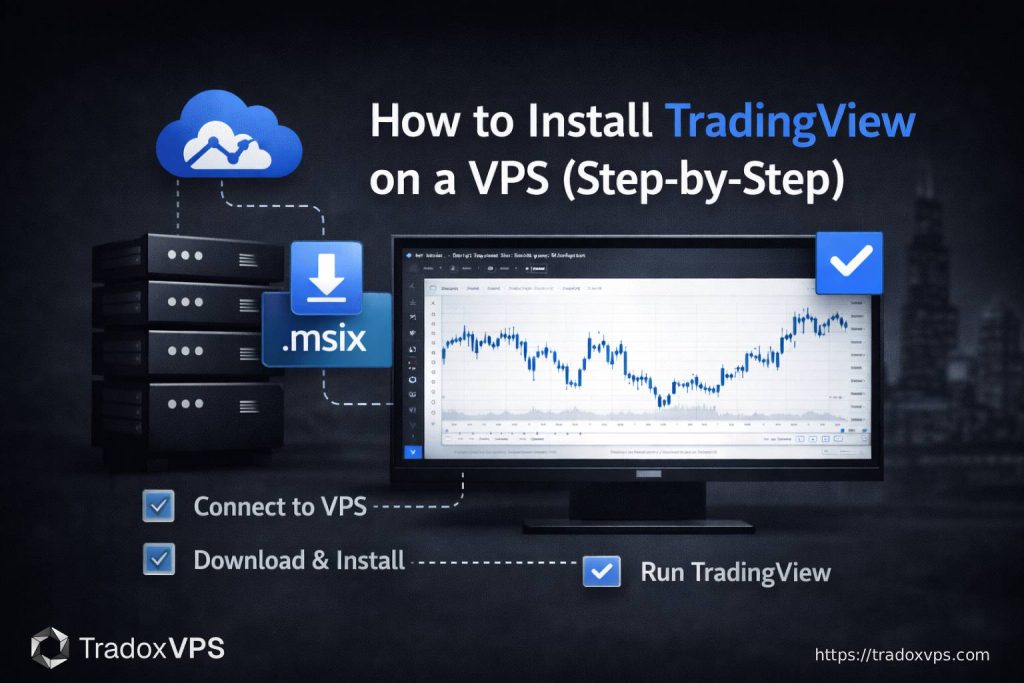
If you tried to install TradingView on your VPS and got the error “Windows can’t open this type of file” when you double-clicked the installer, you are in exactly the right place. This happens to nearly everyone the first time. It is a simple fix and this guide walks you through it step by step.
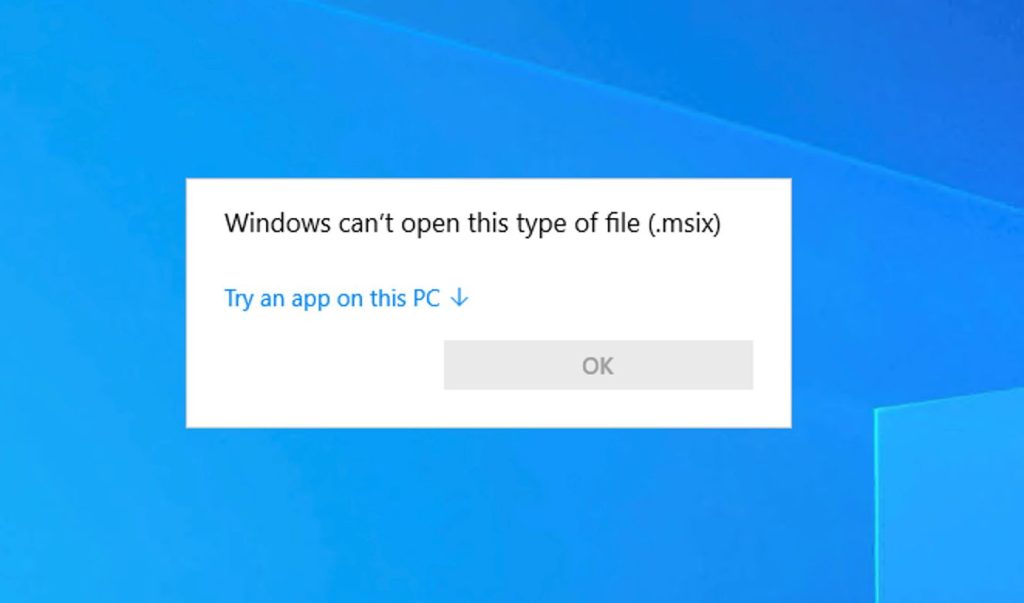
The reason it happens: Windows Server 2022 (the operating system on most trading VPS servers) is missing a component that regular Windows 10 and 11 home computers have built in. Because of this, you cannot install TradingView by double-clicking the file. Instead, you install it using two short commands in PowerShell. The whole process takes about 10 minutes from start to finish.
This guide also covers how to connect to your VPS, how to set up alerts, and how to keep TradingView running 24/7 even when your home PC is off.
What You Need Before Starting
You only need three things:
- Your VPS login details — the IP address, username (almost always
Administrator), and password. These are emailed to you when you sign up. Check your inbox for the welcome email from TradoxVPS. - Remote Desktop — this is already installed on Windows. On a Mac, download Microsoft Remote Desktop for free from the App Store.
- A TradingView account — free or paid. You sign in after installation just like you do on your home computer.
No technical experience is needed. If you can copy and paste, you can follow this guide.
Step 1 — Connect to Your VPS Using Remote Desktop
Remote Desktop lets you see and control your VPS from your home computer, as if you were sitting in front of it. Everything inside the Remote Desktop window is happening on the VPS — in a data center in Chicago — not on your own machine.
Connecting From a Windows PC
- Press Windows key + R on your keyboard. A small Run box will appear.
- Type
mstscinto the box and press Enter. The Remote Desktop Connection window opens. - In the Computer field, type your VPS IP address — for example:
198.51.100.42. You will find this in your TradoxVPS welcome email. - Click Connect.
- When asked for credentials, enter:
- Username:
Administrator - Password: your VPS password (from the welcome email)
- Username:
- Click OK. Your VPS desktop will open on your screen.
Connecting From a Mac
- Open Microsoft Remote Desktop (free from the Mac App Store).
- Click the + button and select Add PC.
- Type your VPS IP address in the PC name field.
- Click Add, then double-click the new connection to open it.
- Enter
Administratoras the username and your VPS password when prompted.
Once connected, you will see a Windows desktop. That is your VPS. From this point, everything you do happens on the VPS — not on your home computer.
Step 2 — Download TradingView Desktop (Inside Your VPS)
All the steps from here forward happen inside the Remote Desktop window — on your VPS, not your home computer.
- Inside your VPS, open Microsoft Edge (the blue browser — it is already installed on Windows Server).
- Go to: tradingview.com/desktop
- Click the Download for Windows button.
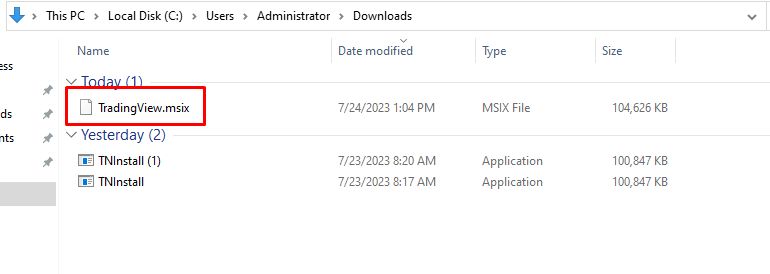
- A file named TradingView.msix will start downloading. Leave it in the default Downloads folder — do not move it anywhere.
Do not try to open the file yet. If you double-click TradingView.msix now, Windows Server will show the “can’t open this type of file” error. That is expected, skip that and go to Step 3 instead.
Step 3 — Download the VCLibs Dependency File
This is the step that most people miss — and the reason the installation fails.
TradingView needs a Microsoft file called VCLibs to run. On regular home computers running Windows 10 or 11, this file comes pre-installed. On Windows Server, it is not included, so you have to download it manually before installing TradingView.
- In your VPS browser, open a new tab.
- Copy and paste this link into the address bar and press Enter:
https://aka.ms/Microsoft.VCLibs.x64.14.00.Desktop.appx- The file Microsoft.VCLibs.x64.14.00.Desktop.appx will download automatically. Let it save to the Downloads folder.
After this step you should have two files in your Downloads folder. You can verify by opening File Explorer and clicking Downloads on the left side:
TradingView.msixMicrosoft.VCLibs.x64.14.00.Desktop.appx
Both files need to be there before you continue.
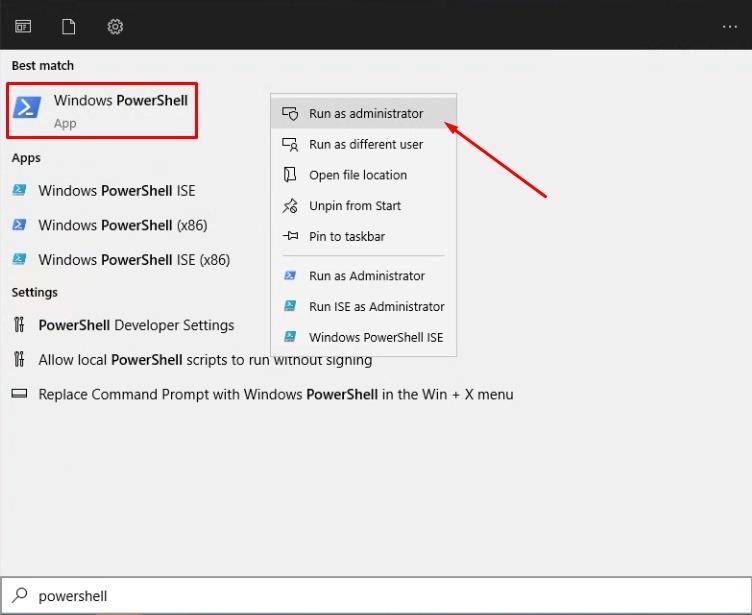
Step 4 — Open PowerShell as Administrator
PowerShell is a command tool built into Windows. You need to open it with Administrator rights — if you do not, the installation commands will fail with a permissions error.
- Right-click the Windows Start button (the Windows icon at the bottom-left of the screen on your VPS).
- In the menu that pops up, click “Windows Terminal (Admin)” — or if you see “Windows PowerShell (Admin)”, click that instead. Either one works.
- A pop-up may ask: “Do you want to allow this app to make changes to your device?” Click Yes.
- A dark terminal window opens.
How to confirm you have the right permissions: look at the title bar of the terminal window. It should say “Administrator: Windows PowerShell” or “Administrator: Windows Terminal”. If the word “Administrator” is not there, close the window and try again — right-click the Start button and make sure you are clicking the “(Admin)” option.
Step 5 — Install VCLibs (First Command)
Now you will run the first of two commands. This installs the VCLibs dependency file you downloaded in Step 3.
Click inside the PowerShell window, then copy and paste this command exactly:
Add-AppxPackage -Path C:\Users\Administrator\Downloads\Microsoft.VCLibs.x64.14.00.Desktop.appxPress Enter.
PowerShell will go quiet for a few seconds and then return to a new blank line. There is no success message — a blank line with the cursor blinking means it worked. If you see red text, check the Troubleshooting section below.
Note on file paths: The command above uses C:\Users\Administrator\Downloads\ — this is the default path when the VPS username is Administrator. If your username is different, replace Administrator in the path with your actual username. You can check your username by opening File Explorer and looking at the folder name under C:\Users\.
Step 6 — Install TradingView (Second Command)
With VCLibs installed, you are now ready to install TradingView itself. In the same PowerShell window, copy and paste this second command:
Add-AppxPackage -Path C:\Users\Administrator\Downloads\TradingView.msixPress Enter.
This one takes a little longer — usually 15 to 30 seconds. Wait until the cursor returns to a new blank line before doing anything else. When it does, TradingView is installed.
You can close the PowerShell window now.
Step 7 — Open TradingView and Sign In
- Click the Start button (Windows icon, bottom-left of your VPS screen).
- Scroll through the list of apps, or type TradingView in the search bar at the top.
- Click TradingView to open it.
- Sign in with your TradingView email and password.
TradingView opens. Your layouts, watchlists, saved charts, and alerts are all synced to your account — they appear automatically when you sign in, just like on your home computer.
Tip: Right-click the TradingView icon in the taskbar and click “Pin to taskbar”. This way, TradingView will be one click away every time you reconnect to your VPS via Remote Desktop.
Step 8 — Set Up Alerts and Webhooks for 24/7 Trading
With TradingView running on your VPS, your alerts will fire around the clock — even when your home computer is off. Here is how to set things up correctly.
Creating a New Alert
- Open any chart in TradingView on your VPS.
- Click the bell icon (Alert button) in the top toolbar, or right-click anywhere on the chart and select Add Alert.
- Set your alert condition — for example: “EMA crosses above price on 5-minute chart.”
- Set the expiry date (or choose “Open-ended” if your plan supports it).
- Under Notifications, choose how you want to be notified: popup, email, app notification, or webhook URL.
- Click Create.
Using Webhooks to Connect TradingView to a Broker or Bot
If you want TradingView alerts to automatically trigger trades — for example, through a broker API or a tool like AutoView, 3Commas, or a custom Python script — you will use TradingView’s webhook feature.
In the Alert dialog, scroll down to the Notifications section and check the Webhook URL box. Paste the URL of your webhook receiver into the field. When the alert fires, TradingView sends a JSON message to that URL automatically.
If you are running a webhook receiver script on the same VPS, its URL will typically look like http://localhost:5000/webhook or something similar. If you are using a third-party service, they will give you the URL to paste.
Keeping TradingView Running After You Disconnect
This is the part that trips up most new VPS users.
When you are done checking your charts, do not log out of Windows on the VPS. Instead, simply close the Remote Desktop window by clicking the X in its title bar. This disconnects your session but leaves the VPS — and TradingView — running in the background.
- Correct: Click the X on the Remote Desktop window to disconnect. TradingView keeps running.
- Wrong: Click Start → Sign Out, or Start → Shut Down. This closes TradingView and stops all alerts.
Next time you open Remote Desktop and connect to the same IP address, you will be taken back to the exact same session — TradingView open, same charts, same alerts active.
Troubleshooting: Fixes for the Most Common Problems
“Windows can’t open this type of file” error
You double-clicked the TradingView.msix file. Do not do that on a Windows Server VPS — it does not work. Use the PowerShell commands in Steps 5 and 6 instead. That is the correct method.
Red error text appears after the VCLibs command
The most common cause is the file path in the command not matching where the file was actually saved. Open File Explorer on the VPS, go to the Downloads folder, and check that the file is there and named exactly Microsoft.VCLibs.x64.14.00.Desktop.appx. Also check that your username in the path is correct — if the VPS username is not Administrator, replace it in the command.
Error code 0x80073CFD during TradingView installation
This error means TradingView was installed without the VCLibs dependency being installed first. Go back and run the VCLibs command from Step 5 again, wait for it to complete, then run the TradingView command from Step 6.
TradingView does not show up in the Start menu
Wait 30 seconds after installation finishes, then open the Start menu and search for “TradingView.” If it still does not appear, restart the VPS using Start → Restart (not Shut Down), reconnect via Remote Desktop, and search again.
TradingView opens to a black or blank screen
This is usually a display resolution issue. Right-click the VPS desktop → click Display settings → increase the resolution to at least 1280×768. If that does not fix it, disconnect and reconnect via Remote Desktop with a higher resolution setting in your Remote Desktop client.
Alerts fire on the VPS but stop after a few days
Check two things: (1) the alert expiry date — TradingView alerts have an expiry and will stop after that date unless set to “Open-ended.” (2) the alert count limit — free TradingView accounts support 1 active alert; Essential supports 20; Plus supports 100; Premium supports 400. If you have hit your plan limit, new alerts will not be created until old ones are deleted.
| Problem | What Caused It | How to Fix It |
|---|---|---|
| “Windows can’t open this type of file” | Double-clicked .msix — not supported on Server | Use PowerShell commands in Steps 5 and 6 |
| Red error after VCLibs command | Wrong file path or wrong username in the command | Check Downloads folder, confirm username, update path |
| Error 0x80073CFD | VCLibs was not installed before TradingView | Re-run Step 5 first, then Step 6 |
| Not in Start menu after install | Windows index not yet updated | Wait 30 seconds or restart the VPS |
| Black screen on launch | Low display resolution | Set resolution to 1280×768 or higher in Display Settings |
| Alerts stop firing | Alert expired or account limit reached | Check expiry date and alert count in TradingView account |
How to Update TradingView on Your VPS
Because TradingView was installed manually on Windows Server, it does not update itself automatically. When a new version is released, TradingView shows a notification inside the app. Updating takes about 2 minutes:
- Inside your VPS browser, go to tradingview.com/desktop and download the new
TradingView.msixfile to the Downloads folder. - Open PowerShell as Administrator (same as Step 4 — right-click Start → Windows Terminal Admin).
- Run this command:
Add-AppxPackage -Path C:\Users\Administrator\Downloads\TradingView.msixThe new version installs over the old one. All your layouts, watchlists, and alerts are saved to your TradingView account online — they are not affected by the update.
Why a VPS Makes TradingView Better for Traders
Once TradingView is running on your VPS, here is what you have actually gained compared to running it on a home PC.
Alerts and Webhooks Run 24/7
TradingView only fires alerts when it is open and connected to the internet. On a home PC, alerts stop whenever you close your laptop, lose power, or your internet cuts out at 3 AM. On a VPS with 99.999% uptime, TradingView stays open around the clock without you doing anything. Every alert fires exactly when it should.
You Can Access Your Charts From Anywhere
Because the VPS is a cloud machine, you can connect to it from your phone, another laptop, a tablet — anywhere. Open your Remote Desktop app, enter the VPS IP, and you are back to your exact setup. Nothing is disrupted. Nothing needs to be reopened.
Lower Latency to Brokers for Futures Traders
TradoxVPS servers are located in Chicago, next to CME Group infrastructure. The round-trip time from TradoxVPS to a CME-connected futures broker averages under 2ms. From a home internet connection, the same trip typically takes 15–80ms. For traders using TradingView webhooks to trigger futures orders, this latency difference affects how quickly your order reaches the broker when markets are moving fast.
No More “My Computer Crashed During a Trade” Stories
Home computers get Windows updates, go to sleep, run out of disk space, or freeze at the worst possible times. A trading VPS is a purpose-built environment — no Windows updates firing in the middle of a session, no background apps eating CPU, no sleep mode. It simply runs.
Frequently Asked Questions
Why can’t I just double-click the TradingView.msix file on my VPS?
Windows Server 2022 does not include the App Installer tool that regular Windows 10/11 uses to open .msix files. When you double-click TradingView.msix on a VPS, you get the error “Windows can’t open this type of file.” The fix is to install TradingView manually using two PowerShell commands — this guide walks through exactly how to do that in Steps 5 and 6.
Do I need a paid TradingView plan to use it on a VPS?
No. TradingView Desktop is free to download and install on any Windows machine, including a VPS. You log in with your existing TradingView account. If you have a free account, you get free features. If you have a paid plan (Essential, Plus, Premium, or Ultimate), all those features work exactly the same on your VPS as they do on your home PC.
Will TradingView alerts keep firing if I close my Remote Desktop session?
Yes — as long as TradingView Desktop remains open on the VPS, alerts keep running even after you disconnect from Remote Desktop. The VPS continues running in the background. This is the main reason traders use a VPS: so alerts fire and webhooks trigger 24/7 without needing to leave their home PC on. Just close the Remote Desktop window (do not log out of Windows) to disconnect without stopping TradingView.
What happens when TradingView releases an update on a VPS?
TradingView Desktop installed via the PowerShell method does not auto-update. When a new version is released, download the latest TradingView.msix from tradingview.com/desktop and run the same Add-AppxPackage command again. This takes about 2 minutes. TradingView will notify you inside the app when an update is available.
How much RAM does TradingView need on a VPS?
TradingView Desktop itself runs comfortably on 4GB RAM. If you are also running a broker terminal or a webhook receiver script on the same VPS, 8GB is the practical minimum. The TradoxVPS Starter plan includes 8GB DDR5 RAM, which comfortably handles TradingView plus a broker terminal running at the same time.
Can I run TradingView in the browser instead of installing the desktop app?
Yes. TradingView works in any browser, including Edge and Chrome on Windows Server 2022. The browser version has exactly the same charting and alert functionality. The desktop app is slightly more reliable for long-running sessions and handles chart layout recovery better after reconnects — which is why it is the recommended option for 24/7 VPS use.
Is TradingView good for automated futures trading on a VPS?
TradingView is excellent for signal generation, charting, and alert triggering. For automated futures trading, the standard workflow is: TradingView fires a webhook alert → a bridge or receiver script running on the VPS catches the signal → the bridge sends the order to your broker terminal or API. TradingView does not submit orders directly to futures exchanges — it needs a connected broker tool or script to actually execute the trade.